TESLA MODEL S 2017 Owner's Manual (UK)
Manufacturer: TESLA, Model Year: 2017, Model line: MODEL S, Model: TESLA MODEL S 2017Pages: 186, PDF Size: 4.67 MB
Page 131 of 186
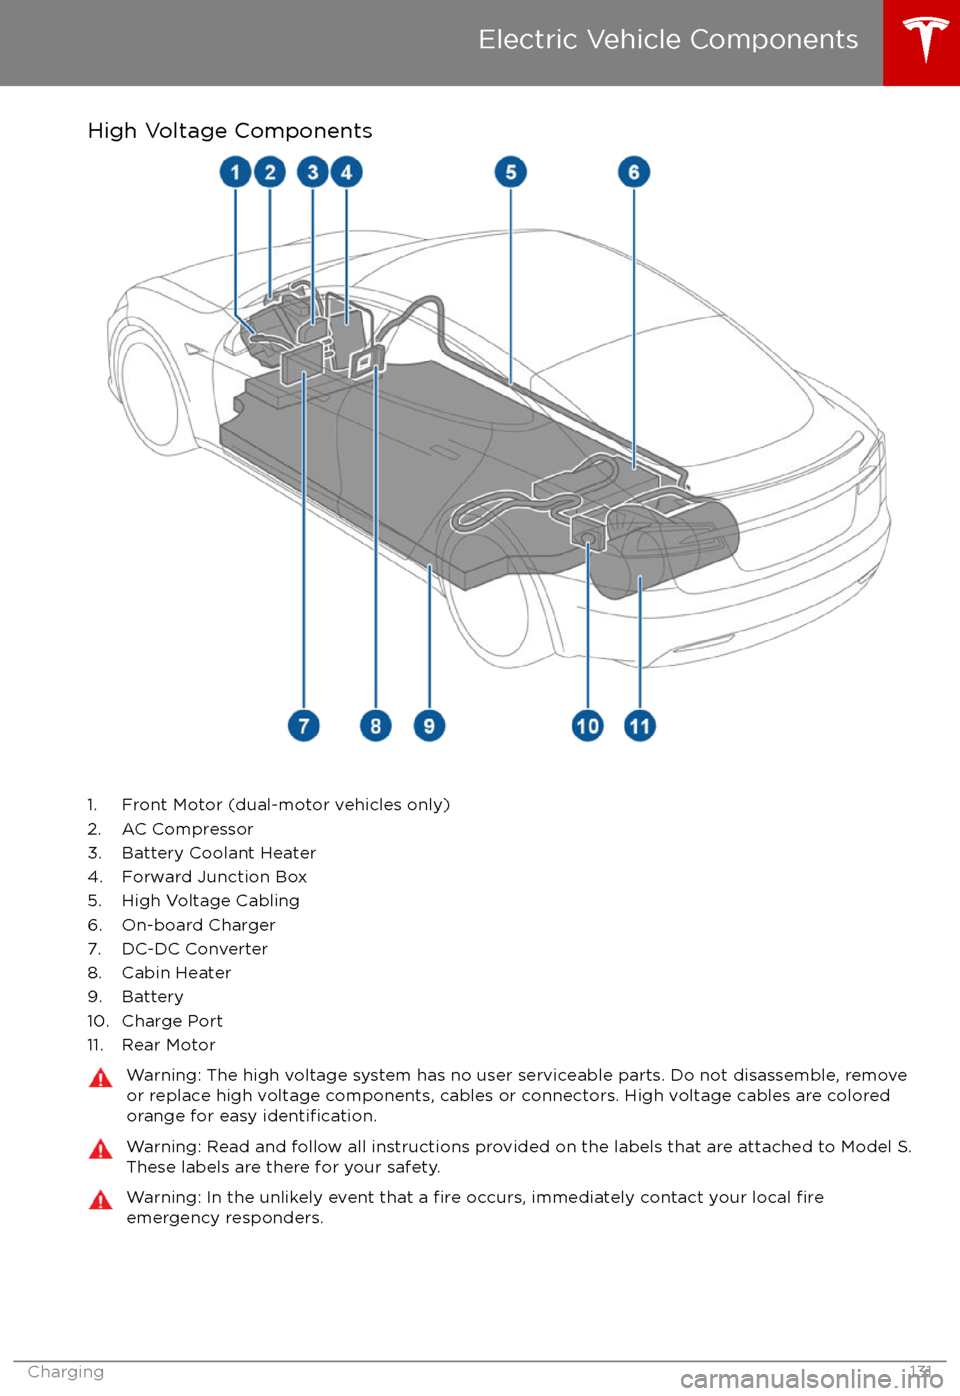
High Voltage Components
1. Front Motor (dual-motor vehicles only)
2. AC Compressor
3. Battery Coolant Heater
4. Forward Junction Box
5. High Voltage Cabling
6. On-board Charger
7. DC-DC Converter
8. Cabin Heater
9. Battery
10. Charge Port
11. Rear Motor
Warning: The high voltage system has no user serviceable parts. Do not disassemble, remove or replace high voltage components, cables or connectors. High voltage cables are coloredorange for easy
identification.
Warning: Read and follow all instructions provided on the labels that are attached to Model S.
These labels are there for your safety.Warning: In the unlikely event that a fire occurs, immediately contact your local fireemergency responders.
Electric Vehicle Components
Charging131
Page 132 of 186
Charging Equipment
Charging equipment designed
specifically to
charge your Model S is available from Tesla. A Tesla Wall Connector, which installs in your
garage, is the fastest way to charge Model S at
home.
In several market regions, Model S is equipped
with a Mobile Connector and the adapter(s)
you need to plug into commonly used power outlets. When using the Mobile Connector,
first plug the Mobile Connector into the power
outlet, then plug in Model S. For more
information about your Mobile Connector, see
the Mobile Connector Owner
Page 133 of 186
About the Battery
Model S has one of the most sophisticated
battery systems in the world. The most
important way to preserve the Battery is to LEAVE YOUR Model S PLUGGED IN when you
are not using it. This is particularly important if you are not planning to drive Model S for
several weeks. When plugged in, Model S wakes up when needed to automatically
maintain a charge level that maximizes the
lifetime of the Battery.
There is no advantage to waiting until the
Battery
Page 134 of 186
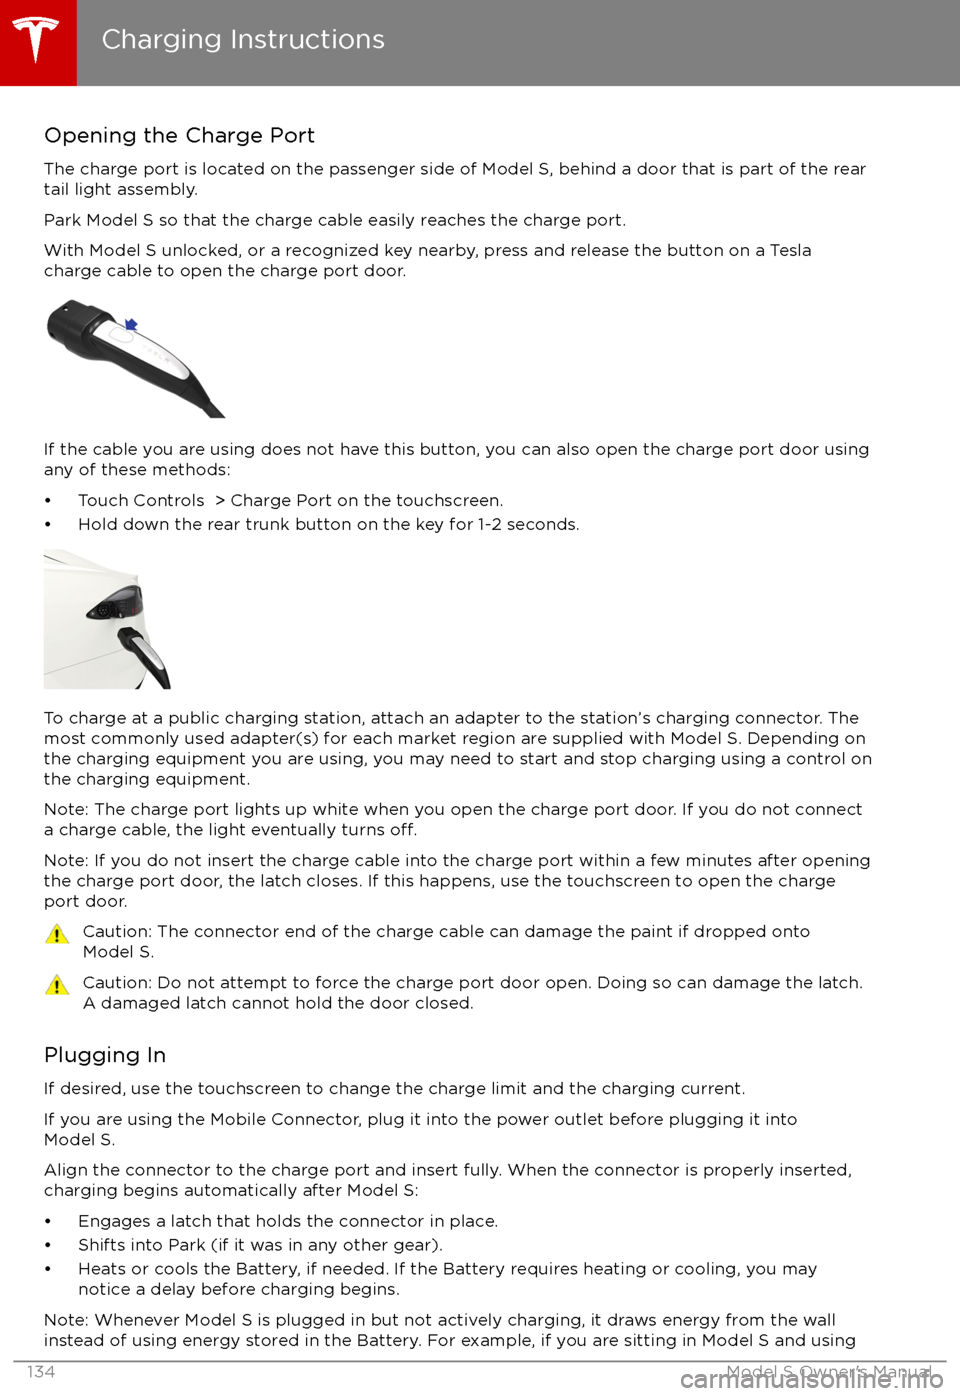
Opening the Charge PortThe charge port is located on the passenger side of Model S, behind a door that is part of the reartail light assembly.
Park Model S so that the charge cable easily reaches the charge port.
With Model S unlocked, or a recognized key nearby, press and release the button on a Tesla
charge cable to open the charge port door.
If the cable you are using does not have this button, you can also open the charge port door using
any of these methods:
Page 135 of 186

the touchscreen while parked and plugged in, Model S draws energy from the wall outlet instead
of the Battery.
During Charging During charging, the charge port pulses green and charging status displays on the instrument
panel. The frequency at which the charge port
Page 136 of 186

1. Charge status messages (such as Charging Scheduled, Charging In Progress) display here.
2. To adjust the charge limit, touch Set Charge Limit, then touch the arrows to move the charge limit setting in 10% increments for daily driving, and 2% increments for trips. The setting youchoose applies to both immediate and scheduled charging sessions.
3.
Location-specific schedule. With Model S in Park, set a specific time when you want Model S
to begin charging at the current location. If, at the scheduled time, Model S is not plugged in
at the location, it will start charging as soon as you plug it in as long as you are plugging it in
within six hours of the scheduled time. If you plug in after six hours, Model S does not start charging until the scheduled time on the next day. To override this setting, touch Start
Charging or Stop Charging (see item 4). When you set a scheduled charging time, Model S displays the set time on the instrument panel and the touchscreen.
4. Touch to open the charge port door or to start (or stop) charging.
5. The current automatically sets to the maximum current available from the attached charge cable, unless it was previously reduced to a lower level.
For 3-phase charging, the available current represents the current per phase (up to 32 amps).
During charging, the right status
flag displays the 3-phase symbol in front of the displayed
current.
If needed, touch the up/down arrows to change the current (for example, you may want to
reduce the current if you are concerned about overloading a domestic wiring circuit shared by other equipment). It is not possible to set the charging current to a level that exceeds themaximum available from the attached charge cable.
When you change the current, Model S remembers the location. So if you subsequently charge at the same location, you do not need to change it again.
Note: If Model S automatically reduced a charging location
Page 137 of 186

Charging Status
The following illustration is provided for demonstration purposes only and may vary slightly
depending on the software version and market region of your Model S.
1. Charging status information. For example, if Model S is charging, it displays the time remaining until fully charged at the currently selected charge level. When a charging session
has been scheduled, it displays when charging starts.
2. Total estimated driving distance (or energy) available. Instead of driving distance as shown here, you can display the percentage of battery energy remaining by touching Controls >Settings > Language & Units > Energy & Charging .
Note: A portion of the battery image may appear blue. This indicates that a small portion of
the energy stored in the battery is not available because the battery is cold. This is normal and
no reason for concern. When the battery warms up, the blue portion no longer displays.
3. Charging rate per hour.
4. Estimated increase in driving distance (or energy) achieved so far in this charging session. Instead of driving distance as illustrated above, you can display the amount of energy gained
by touching Controls > Settings > Language & Units > Energy & Charging .
5. Current being supplied/current available from the connected power supply (see Changing
Charge Settings on page 135).
If connected to a 3-phase power supply, the available current represents the
current per phase and the 3-phase symbol displays.
6. Voltage being supplied by the charge cable.
Note: If Model S is charging and detects unexpected
Page 138 of 186
Service Intervals
Regular maintenance is the key to ensuring
the continued reliability and
efficiency of your
Model S.
Rotate the tires every 6,250 miles
(10,000 km), maintain the correct tire pressures, and take Model S to Tesla at theregularly scheduled maintenance intervals of
every 12 months, or every 12,500 miles (20,000 km), whichever comes
first. It is also
important to perform the daily and monthly
checks described below.
Model S must be serviced by
Tesla-certifiedtechnicians. Damages or failures caused by
maintenance or repairs performed by non- Tesla
certified technicians are not covered by
the warranty.
Daily Checks
Page 139 of 186
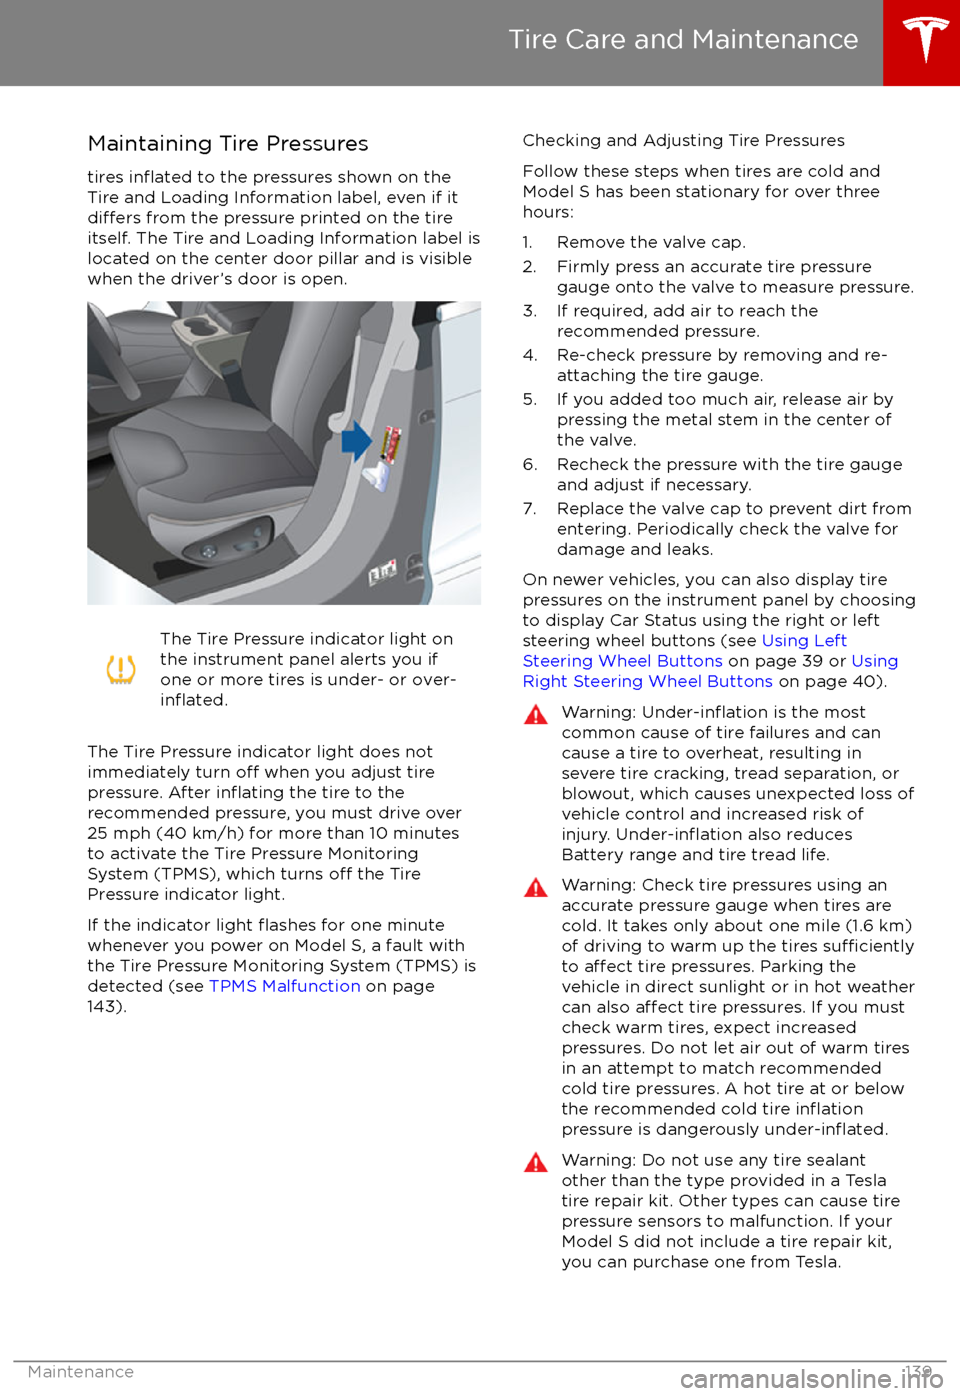
Maintaining Tire Pressures
tires
inflated to the pressures shown on the
Tire and Loading Information label, even if it
differs from the pressure printed on the tire
itself. The Tire and Loading Information label is
located on the center door pillar and is visible
when the driver
Page 140 of 186

Inspecting and Maintaining TiresRegularly inspect the tread and side walls for
any sign of distortion (bulges), cuts or wear.Warning: Do not drive Model S if a tire is
damaged, excessively worn, or inflated to
an incorrect pressure. Check tires
regularly for wear, and ensure there are
no cuts, bulges or exposure of the ply/
cord structure.
Tire Wear
Adequate tread depth is important for proper
tire performance. Tires with a tread depth less
than 4/32” (3 mm) are more likely to
hydroplane in wet conditions and should not
be used. Tires with a tread depth less than
5/32” (4 mm) do not perform well in snow and
slush and should not be used when driving in
winter conditions.
Model S is originally
fitted with tires that have
wear indicators molded into the tread pattern. When the tread has been worn down to 4/32”(3 mm), the indicators start to appear at thesurface of the tread pattern, producing the
effect of a continuous band of rubber across
the width of the tire. For optimal performance and safety, Tesla recommends replacing tires
before the wear indicators are visible.
Tire Rotation, Balance, and Wheel Alignment
Tesla recommends rotating the tires every
6250 miles (10,000 km).
Unbalanced wheels (sometimes noticeable as
vibration through the steering wheel)
affectvehicle handling and tire life. Even with regular
use, wheels can get out of balance. Therefore,
they should be balanced as required.
If tire wear is uneven (on one side of the tire
only) or becomes abnormally excessive, check
the alignment of wheels.
Note: When replacing only two tires, always
install the new tires on the rear.
Punctured Tires
A puncture eventually causes the tire to lose pressure, which is why it is important to check
tire pressures frequently. Permanently repair
or replace punctured or damaged tires as
soon as possible.
Your tubeless tires may not leak when
penetrated, provided the object remains in the tire. If, however, you feel a sudden vibration or
ride disturbance while driving, or you suspect a tire is damaged, immediately reduce yourspeed. Drive slowly, while avoiding heavy
braking or sharp steering and, when safe to do so, stop the vehicle. Arrange to have Model S
transported to a Tesla service center, or to a
nearby tire repair center.
Note: In some cases, you can temporarily
repair small tire punctures (under 1/4” (6
mm)) using an optional tire repair kit available
from Tesla. This allows you to slowly drive
Model S to Tesla or to a nearby tire repair
facility (see Temporary Tire Repair on page
145).Warning: Do not drive with a punctured
tire, even if the puncture has not causedthe tire to
deflate. A punctured tire candeflate suddenly at any time.
Flat Spots
If Model S is stationary for a long period in
high temperatures, tires can form
flat spots.
When Model S is driven, these flat spots cause
a vibration which gradually disappears as the
tires warm up and regain their original shape.
To minimize
flat spots during storage, inflatetires to the maximum pressure indicated on the tire wall. Then, before driving, release airto adjust tire pressure to the recommended
levels.
Improving Tire Mileage
To improve the mileage you get from your
tires, maintain tires at the recommended tire
pressures, observe speed limits and advisory
speeds, and avoid: